Wednesday 1 October 2014

Mountains & Munchies in Mallorca - part 2

After spending the day in Pollenca old town, we headed back to the pool to cool off. 


We then got a bit spruced up and took ourselves back to Pollenca to a lovely little restaurant called Manzanas y Peras.


We booked, and if you go in the Summer months then I would definitely recommend doing the same. They don't have very many tables outdoors as they are set up on the first 20 or so steps of the 365 that lead up to an old chapel on top of a hill, and they were fully booked when we went.

Mallorca is fairly veggie friendly, although in a lot of restaurants you will find the same options.

But not at Manzanas y Peras - they had some of the most interesting and delicious vegetarian tapas that I have ever had.

We wined and dined while the sun went down and the atmosphere in the square became more romantic. Every table was lit with candles and the trees sparkled with fairy lights.

As romantic as this was, it didn't make the best lighting for food photos. But we had the tapas feast menu, and it really was. Look at this little lot...


The standout dishes for me were beetroot and chickpea puree with pitta bread, and artichokes & sultanas in Pedro Ximenez sherry. All inspired combinations, and things I have never had together before!

The whole town has such a relaxed feel at night, with people sitting around drinking wine while their children spin and play in the squares.


If you make one trip while in Mallorca, then head to Pollenca. And if you get hungry while you're there, then head to Manzanas y Peras for a tapas FEAST. But make sure you book!


Tuesday 30 September 2014

Mountains & Munchies in Mallorca - part 1

Have you ever been to Mallorca? If not then I'm here to sell it to you in this series of posts. If you have - well, let's reminisce together. What's your favourite place in Mallorca?

Unfortunately I don't get commission for this, but I would happily go back and write a follow up post...so, ya know, holiday offers welcome...

Mallorca sometimes get a bad rep as a stereotypical Brits abroad, high rise resorts, lets-all-eat-McDonalds-kebabs-and-spag-bol kinda place. But outside of the big high rise resorts it is really a beautiful place with pretty seaside villages and dramatic mountains and scenery. Oh and tapas. And paella. And delicious wine...


We stayed in Port de Pollence, where we spent some time relaxing by the pool and on the beautiful beaches, mainly reading and snorkelling with the fish. And getting involved in our own friendly (competitive) bat & ball competition (I won). 

But there is a lot to see and do, and so we dragged our backsides away from our sunbeds and into our hire car. 

First stop Pollenca old town - complete with lots of cute alleys, atmospheric squares surrounded by outdoor cafes and pretty shops for window shopping.


Plus an AMAZING market every Sunday. It stretches through pretty much the whole town, and has fruit and veg..

...as well as jewellery, art, clothes, and so much more that we didn't have time to explore. Markets like this are one of my favourite holiday activites.


After walking what felt like miles around the market, we decided it was time for a change of scenery, and headed up the 365 steps to a sweet little chapel (with a couple of stops for appreciating the vistas and catching our breath).


Made it!


We had just enough breath left in our lungs to stop and enjoy the view and snap a quick selfie...


...before we headed back down and booked a beautiful little restaurant for dinner with a separate veggie (believe it or not) tapas menu. More on that later!

Sunday 28 September 2014

Three ways with courgette

My dad has an allotment, which is such hard work but also really rewarding. Most of the preparation happens during Autumn and Winter, but I'm a fair weather friend on the allotment. I like the hot summer days when the plants are dripping with firm pea pods or ripening tomatoes, and there is enough produce to put one in the box and one in your mouth while picking.

Some years the allotment isn't as successful as others, or some crops are far more successful than others. A classic problem of allotmenting is a glut - when you end up with so much of one thing that you can't possible use it all yourself. Great news if you are the scrounging daughter of an allotmenter and trying to live on a budget...

This bad boy was donated to me, because this year the courgette plants went mad and, really, how many of these beasts do you really need?! I managed to make three courgette-based dishes out of this one, and I was surprised how well they went down at dinner time.


Recipe 1 - Courgette fritters


1/3 massive courgette or 2 normal size courgettes - grated
2 tbsp flour (any, although self-raising is preferred)
25g parmigiana - grated
25g cheddar - grated
Handful peas (optional)
Few mint leaves - roughly torn
Olive oil
S & P


Courgettes contain a lot of water, and you need to get rid of some of this before you cook them otherwise you will end up with really soggy fritters that won't really work. I put my grated courgette in a colander or sieve, put it over a bowl, and pop a plate on top of the courgette with something to weigh it down (like a cookbook or even just a bowl). Leave these for at least 25-30 mins.

Mix the courgette, flour, cheese, peas and mint together in a bowl. Add a bit more flour if it isn't holding together. Season well.

Heat a glug of olive oil in a non-stick frying pan.

Take a tablespoon full of the mixture, roll into a ball, and then flatten to about a cm thick. (You might want to put a bit of flour on your hands for this bit.as the mixture will be stick)  Gently place your fritter into the hot oil, and fry until golden (approx 4 mins each side - try not to move them around too much, tempting as it is). Flip, and do the same again on the other side.

Serve with potatoes of your choice, and top with a poached egg. Easy, healthy, and delish!


Recipe 2 - Courgette and potato soup


This soup couldn't be easier. Winter is coming (cheeky Game of Thrones ref), and this will be a cheap and warming lunch for when it does.


2 large potatoes - peeled & chopped into chunks
500ml hot vegetable stock
1 onion - thinly sliced
1/3 large courgette, or 2 medium ones - grated
300ml milk
Dash of cream (optional)
White pepper, salt
Olive oil


Pop the potatoes and stock into a pan and bring to the boil. Simmer until the potatoes are tender. Then whizz this mixture up with a hand blender and season this mix well.

In the mean time gently saute the onions in some olive oil in a large pan until softened. Add the courgettes and cook for a couple of minutes. Add the potato mix, milk, cream (if using) and seasoning. Bring to a simmer, and cook until heated through and the courgettes are soft. 

Serve with a crack of black pepper and some crusty bread.

Recipe 3 - Courgette & bulghur wheat salad with halloumi


What did the cheese say when it looked in the mirror? Halloumi!

This dinner went down particularly well in the Store Cupboard Veggie household - mainly because we have a bit of an obsession with the salty and delicious halloumi, but also the zesty and fresh salad is really tasty.

200g bulghur wheat - cooked to packet instructions and cooled
1/3 massive courgette, or 1-2 medium ones - grated
Peas - raw if fresh, or cooked and cooled if frozen
Half a lemon
Olive oil
Lemon zest
1 garlic clove - crushed.
Fresh mint
1 pack halloumi
S&P


Again with this recipe it is a good idea to drain some of the water out of the courgettes first.

Pop the halloumi on to grill - either on a barbecue or griddle pan. 

Once cooled, combine the bulghur wheat, grated courgette and peas. Squeeze in half a lemon and add some of the zest to taste. Add a couple of good glugs of decent olive oil (extra virgin if you have it), garlic, and plenty of salt and pepper. Give it a good mix.

Serve garnished with torn mint, and topped with the perfectly grilled halloumi. Yummy!


Sunday 6 July 2014

Easy peasy papaya

Sometime in the last couple of weeks, we had a bit of nice weather. And it was glorious.

I don't know about you but I don't always feel like eating massive meals when it's hot outside, and I especially don't feel like slaving over the hob or sticking my head in a hot oven (for food purposes - you don't need to send help).

This makes a really easy peasy (and pretty) lunch, light dinner with a salad, or refreshing starter for a meal with friends. I'm not sure where this recipe originally came from, but it was served to me about 10 years ago by a family friend and has been a favourite ever since.

Papaya isn't something that I have in the house particularly often, but sometimes I see them on offer in the supermarket because they are perfectly ripe, and can't resist snapping them up.

Reducing waste isn't just about using up what's in your own fridge - supermarkets chuck out tonnes of fresh food every year, so if you have the capacity to use something up that's on offer because it only has a couple of days left on it then do it! If you shop sensibly and plan your meals then you can get bargains on things you wouldn't normally look at because they are too expensive or you always waste them.

As mentioned this recipe is ridiculously easy to prepare, and only needs a few ingredients but the combination is so refreshing and I highly recommend that you give it a go.

1 papaya per person (for lunch or light dinner) or 1/2 per person (as a starter)
150g cottage cheese per papaya
1 lime

Cut the papayas in half and scoop out the seeds and fibres using a teaspoon. Put this into a bowl.

Squeeze lime juice over the cut side of the papayas.

Spoon in around 75g of cottage cheese per half a papaya (although use more if you love cottage cheese like I do).

Squeeze some more lime over the top, and sprinkle on some of the papaya seeds. A bit like watermelon seeds these are not to everyone's liking, but I love their peppery flavour and slight crunch.

Serve!


Use It All Up Ra-tatatat-ouille

My last Use It All Up recipe - this delicious and easy stir fry - was the most popular blog post for The Store Cupboard Veggie so far.

I'm not sure whether you all just really love stir fry, or whether you are really on board with the idea of reducing wasted food and using up all the bits and bobs in your fridge. Feel free to tell me which it is in the comments below - it will really help me target my posts to talk about things people are the most interested in.

Until then I will blindly stumble on, and suggest another easy Use It All Up recipe - and I know it's a good one because I made something very similar at my latest FoodCycle adventure yesterday. It's always like a stamp of approval for using-it-all-up when it is a FoodCycle staple recipe...one of the main points of the charity is to reduce waste so this is clearly a good a way to do that!

As ever with a use-it-all-up-type recipe don't feel that you have to stick to these ingredients, feel free to shove in a whole variety of vegetables - anything that will cook well in a big pot on the hob and then in the oven.

Just a quick caveat...I don't always take the best food photos, but I'm not sure why this is one is quite so shonky. Maybe I was just really, really, ridiculously hungry?!

Oil
1 large onion, diced
3-4 garlic cloves (dependent on size) sliced or crushed
1 chili, sliced
1 tbsp tomato puree
1 large pepper (any colour, or a combo), diced
1/2 butternut squash, peeled and diced
1 aubergine
1/2 courgette if you have it
2 small potatoes, diced the same size as the squash
1 tin of tomatoes
Tsp sugar
Boiling water
Handful french/green beans, topped and tailed
Salt and pepper
Dried herbs (optional)

Preheat your oven to 200 degrees.

Saute the onions in a large oven-proof pan (a casserole dish that can be used on the hob is perfect).

Once the onions are softened, add in the garlic, chili, pepper and tomato puree. Fry these off for around five minutes, but be careful not to burn the garlic or chili. Add in the butternut squash and potato and fry this for a couple of minutes.

Remove all of this from the pan and pop in a bowl. Add a little more oil to the pan, and once heated add in the aubergine and courgette. Fry for around 5 minutes, stirring occasionally and making sure it doesn't stick.

Add the other vegetable mixture back in, along with the tomatoes and sugar. Add in enough boiling water to just cover the vegetables - this will depend on your pan size but around 250ml. Stir in the french/green beans

Season well with salt and pepper, and some dried herbs if you have them.

Pop the lid on, and put the pan in the oven.

Cook in the oven for around 30-40 minutes, or until the squash and potatoes are soft. Give it a stir occasionally, and you can add in more water if needed.

Serve with rice, cous cous or quinoa, a dollop of creme fraiche and some fresh mint or coriander (if you have it - I didn't).


Monday 9 June 2014

Sunshine, garden guests and easy brunch

The sun was actually shining at the weekend - hurray!

We took advantage and had a lovely sunny brunch in the garden. Delightful.

But wait! Who's that watching us from beside the shed? It is our new garden buddies - Walt and Jesse (for all you Breaking Bad fans out there - don't tell me what happens, I'm only at the start of season 5).


Aren't they delicious? They have taken up residence under our shed.

Libby tried her best to out-cute them...


And when that failed...out-pose them...


Attention seeking kitty.

This is just what a sunny weekend morning needs - I know some people don't like foxes in their gardens, but at the moment we are sharing the space quite successfully, and I love watching them gambling about with their foxy mum (and sometimes dad - we assume, I haven't checked!).

Anyway, after we (I) took a million pictures of the wildlife in our garden, we got down to the serious matter of brunching.

If you are ever after a brunch dish for a vegetarian friend, or a meat eating friend for that matter, then this is PERFECT. It is different from the usual choices for brunch, and actually relatively healthy.

I have been experimenting with different methods of poaching my eggs as I have always struggled slightly... these aren't the best I have done, but I will do a follow up post with my new found method!

1 ripe avocado
Juice of half a lime
Chili - finely sliced (optional)
1 tomato - cut into small chunks (16ths works best)
2 eggs per person
Nice crusty bread - sour dough works well, or just a crusty loaf
Black Pepper
Salt

Peel and de-stone the avocado. Pop it in a bowl. Add in the lime juice and give it a good mash with a fork or masher. The lime juice tastes great, but also stops the avocado going brown. Season it up well.

Stir the tomato and optional chili into the avo mix.

Get your eggs on to poach - for these ones I used the swirling vortex of boiling water method. I think my water was boiling too fast...hence the slightly ropey look around the outside. They weren't too bad, but I have found a better method. You will have to wait for that post while I perfect them...

Slice up your bread, and spread with the avocado mixture.

Top with the poached eggs, and crack plenty of black pepper on top. I sprinkled thyme leaves on too.

Serve with a large cuppa and a generous helping of Sunday morning laziness. Sunshine and fox cubs optional, but recommended.


It was too delicious - I had to dig in!


FoodCycle volunteering - take 3!

It has been really rather a long time since I posted a blog post. I have no excuse for this at all - I seem to have been filling my evenings and weekends quite successfully with no time for cooking anything of note or sitting down to write.

So to ease myself back in gently, and as last week was national volunteering week, I thought I would update you on the last time I went FoodCycling in Wandsworth.

For those of you that don't know and haven't seen my previous post on this (check it out here), FoodCycle is a charity that aims to reduce food waste while reducing poverty and building communities at the same time.

The basic premise is that supermarkets and shops throw away huge amounts of perfectly edible fresh ingredients every single day. So FoodCycle volunteers gather up that food on a Saturday morning, and cook a three course meal from the ingredients they are given. It's then served to anyone who fancies a free lunch - with table clothes and proper table service.

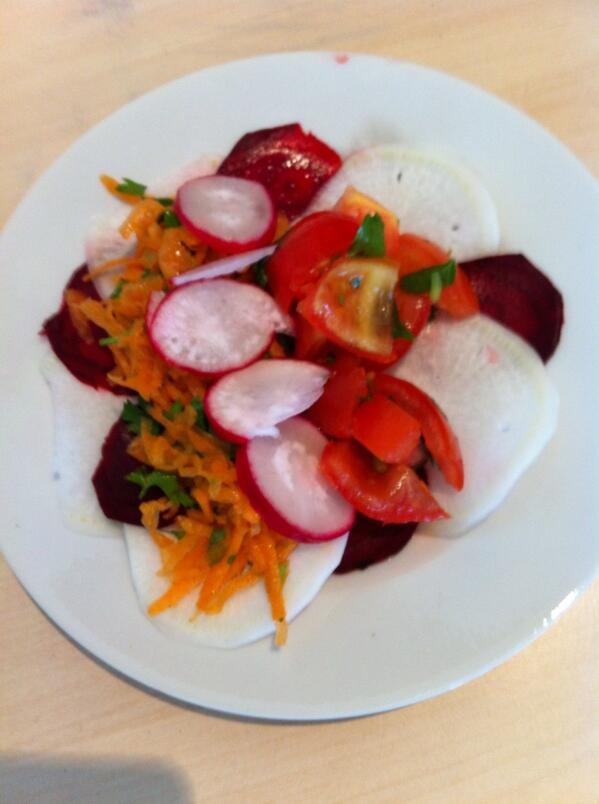
This week there was lots of beetroot and mooli, plenty of carrots and caulis, and lots of bashed fruits.

The menu was Rainbow Salad, Spicy Vegetable Pilaf and a Bread and Butter Pudding.

Here is the Rainbow Salad - it isn't the best example (most were much prettier than this), but it tasted delicious. Who knew mooli was so nice just thinly sliced? Not me, but through complete experimentation I have discovered a new ingredient.

Embedded image permalink

Anyway there are FoodCycles all over the country, and if there isn't one in your local area then you can look in to starting one!

I would highly recommend it - it can be hard work in the kitchen, but it is always a lot of fun and I learn something new each time I go. Plus it's great seeing people getting a good hearty healthy meal, with ingredients that would have gone to waste otherwise!

Sunday 27 April 2014

Easy Mr Alan Aubergine Recipe

I'm not really sure what to call this aubergine (or eggplant for you Americans) recipe, it is a kind of stew-come-goulash-come-caponata.

I decided to give it a formal title, after one of the main ingredients (it was going to be Sir Alan, but it's a very lovely dish - and I find Sir Alan neither lovely nor a dish).

Aubergine is one of my very favourite ingredients at the moment. Some people hate it, but I think if cooked well it has a lovely smokey flavour and is a really flexible ingredient. If you still really hate Aubergines...then why not try this...


How damn cute is he?! Plus it was World Penguin Day on Friday so this could be the way to celebrate it. This lovely little penguin aubergine is from the first European vegetable carving competition in 2011 - I didn't know this existed until today but it is now my favourite competition. Does vegetable carving count as a way to reduce waste?!

This is another use it all up type recipe - for vegetables I used aubergine and sweet potato. I would generally stick to including aubergine, but you could also add potatoes, carrots, peppers or squash. Some of those jarred chargrilled peppers would also be nice, and capers if you have them.

1 large or two small aubergines - chopped into chunks
2 sweet potatoes - peeled and chopped into chunks
Tbsp paprika - any type, or a combination of two
1 red onion or a couple of shallots - chopped finely
2 cloves garlic - sliced thinly or crushed
1 tin of tomatoes
Tsp tomato puree
Tsp sugar
Tin of pulses - chickpeas or cannellini beans work well
Handful of olives
Olive oil
tbsp capers (optional)
Chopped and creme fraiche to serve (optional)

Preheat the oven to 200 degrees. Pop the aubergine and sweet potato (plus any other vegetables) into a roasting tin and drizzle with olive oil. Into the oven until soft and the aubergine is starting to go slightly brown around the edges - probably around 30-40 minutes.

In the mean time heat a glug of olive oil in a heavy bottom sauce pan or casserole dish. Chuck in the onions and cook on a medium heat until they start to soften and go transparent.

Stir in the tomato puree, garlic and paprika. 

I absolutely love the colour at this point. Paprika makes everything beautiful!

Cook this for 1-2 minutes.

Stir in the tinned tomatoes and sugar. Season.

Turn the heat down and cook the tomatoes for around 10 minutes. You can put the lid on or add some water if it looks like it's getting a bit dry.

Stir in the pulses, olives and capers (if you have them).

Once the roasted vegetables are ready, spoon them in and stir them in to the sauce. Cook for around a further five minutes. 

Serve with quinoa, couscous, rice or pasta and garnished with a few fresh herbs if you have them, and a dollop of creme fraiche or soured cream.


Delicious!


Tuesday 22 April 2014

Beautiful beetroot salad

Did anyone else over-indulge at Easter? 

It should be pretty much a given, what with chocolate eggs, Easter meals and plenty of wine. But it was totally worth it!

Today it was back to reality. Back to work and trying to maintain some semblance of a healthy lifestyle (such as it is). I don't know about you but I sometimes struggle with inspiration for healthy food, and no more so than when I have had a fully indulgent few days.

I tend to find inspiration in the usual places - recipe books, blogs, pinterest, restaurants etc. Today I found it in a rather unusual place...

My own face. Yep. And not in a vain way. More in a "I worked out after four days of chocolate and wine and turned myself into a beetroot". Yes I'm on the floor, and yes it is because I was too tired to stand.


And that reminded me that I had two beetroots nestling in my vegetable drawer. I had a hate relationship with beetroot until a couple of years ago - it tended to make me think of the vinegar laden stuff I used to pick out of salads, and I genuinely disliked it.

But then I discovered roasted beetroot, and it is truly delicious. If there are any beetroot haters out there then I recommend trying this salad. It may just convert you in to a beetroot lover, I hope it does.

This beetroot salad recipe is healthy and delicious. Plus with ingredients as pretty as these, you know it's going to be beautiful too.


2 large beetroots - peeled and chopped into chunks
1 bulb of garlic, separated into cloves
Bulgar wheat - enough for however many portions you want
2 large shallots, or 3 small ones - sliced thinly into moons or half moons
Handful black olives - sliced thinly
Olive Oil
Balsamic Vinegar
6 or 7 sprigs of thyme
Handful of mint

Pre-heat your over to around 200. Pop your beetroot, garlic and thyme into a roasting dish and drizzle with some a generous glug of olive oil.

While they are cooking, cook your bulgar wheat according to the packet instructions.

Once it is ready and cooled slightly, mix in the olives and shallots. 

Mix a simple dressing of olive oil and balsamic vinegar. You could also use lime or lemon juice for this - I didn't have any in the house though so went for balsamic vinegar. General rule is two parts olive oil to one part acid. Season with salt and pepper.

The beetroot will take about half an hour depending on the size of the chunks. Once it is softened remove it from the oven. 

Squeeze the garlic cloves into the dressing. If any are too hard to squeeze (which dependent on size they may be) then remove them from their skins and chop them into small pieces. Mix with the bulgar wheat.

Combine the beetroot, bulgar wheat and dressing together. Garnish with chopped mint.

Enjoy!


Instant frozen yoghurt (or yogurt)

Today I had a really enjoyable day on a work course, and topped it off with an early finish and the sun shining in London.


Look how beautiful London is in the sunshine...


It's not quite summer yet, but it sure feels like it is well on its way. What better way to celebrate the sunshine, and to get over the over-indulgences of Easter, than to whip up this instant, healthy, fruity, frozen yoghurt?

How many times have you bought fresh berries in the supermarket, and then not eaten them quite quickly enough? This has happened to me on so many occasions - not only does this not fit with the ethos of this blog, but berries are blooming expensive.

So how to stop this travesty (not a drama queen at all)? Buy frozen berries! They are actually relatively cheap (I bought mine from Sainsbury's basics range - £1.30 for 400g), and obviously keep for a really long time.

Again this makes use of my trusty hand processor, as well as some left over yoghurt. This would work with most flavours of yoghurt, and turns a simple pot of yoghurt into a more impressive and delicious summer dessert. It is so so so easy too!

250-300g yoghurt (plain or fruit)
Roughly 150g mixed frozen berries
Handful of fresh berries (if you have them)
Couple of sprigs of mint

There are pretty much four steps to this...

Pop the yoghurt and frozen berries into the processor.

Whizz up until the berries are incorporated into it, and it takes on a frozen-ish consistency. It wont be quite like ice cream, but it will be more solid than normal yoghurt. INSTANT FROZEN YOGHURT!

Spoon into glasses and serve with a handful of berries and some mint sprigs.

EAT.

(A secret fifth step is that if you don't need it straight away, or don't have quite enough frozen berries, then just pop it in the freezer and take out when you need it. Give it about five minutes out of the freezer if you do this, otherwise it will be colder than a penguin's belly button).

Just look at this beauty...


Saturday 5 April 2014

Red onion, feta and olive tart

The sun is finally shining, and it is nearly time for summer-time dinners in the garden. This tart makes me think of summer weekend evenings with friends over and a glass of crisp, cold white wine. It looks and taste much more impressive and complicated than it really is. And it fits with my top tips...

Experiment, experiment, experiment. This week I have been super-duper brave and tried to make puff pastry myself from scratch. What a ridiculous plan I hear you scream! But actually I cheated slightly...

I followed this recipe, also known as "Cheat's rough puff pastry". Try it - it was pretty successful for me actually, and was so much tastier than shop bought. Also cheaper. And you can make it in advance. Plus people will be really impressed that you made your own pastry - and the level of satisfaction when it turns out well really will give you a cooking boost.

Olive oil
2 large red onions - sliced thinly
150ml Balsamic Vinegar
70g Brown sugar
Enough of the cheat's rough puff to cover a medium sized baking tray
1 block of feta
Good handful of black or green olives - pitted and sliced thinly
50g Pine nuts - toasted slightly

Make your pastry and pop in the fridge until ready to use. The recipe above will give enough for this tart, plus a bit more so you could use this for a couple of small tarts the next day, or perhaps something sweet.

Heat a couple of glugs of olive oil in a pan, and add in the onions. Cook gently until the onions are soft and getting sticky. Stir in the balsamic vinegar and brown sugar, then cook on a low heat until it is gooey and sweet. Do taste it and add in more sugar or balsamic to you taste.

Roll out the pastry into a rectangle to fit on a lined baking tray. Cut off any excess. Prick the base with a fork.

Score a line about 2 centimeters in from the edge all the way around - don't put any topping on this bit.

Spread the sticky onion balsamic mixture on the base, then crumble over the feta and sprinkle on the olives and pine nuts.

Brush the edge of the pastry with a bit of milk or egg.

Pop in a medium heat oven for about 25 minutes, or until the pastry is puffed up and golden and the feta is slightly golden too.

Serve either hot, warm or cold with potatoes and vegetables, or a selection of salads. And a cold glass of white wine. And some sunshine.


Spicy vegetarian chilli with "tortilla chips" and smashed avocado

Have you ever seen Michael McIntyre's sketch about the spice cupboard? If not watch it, because my description will never ever do it justice. He plays each of the spices languishing in people's cupboards that never get used.

Did you know that spices don't keep forever? Shocking, right?! And they actually lose their potency quite quickly. So it really is use them or lose them. I am against buying masses of spices that you will only use in one recipe. Stick to a basic store cupboard selection, and before adding to it think carefully about whether you will actually use the spice in more than one recipe, or how often you plan to make the one you are buying it for.

My store cupboard essentials are -
Paprika (any variety - sweet, smoked, hot. Or a selection of these)
Chili powder or dried chili flakes
Cumin - seeds or ground, or both if you will use them
Coriander - again seeds or ground
Ginger - as well as frozen fresh ginger in the freezer
Cinnamon
Turmeric
Sumac - just because I love it

These can be bought in more supermarkets, but if you do have an Asian store nearby I would definitely recommend a trip there. My mum and I buy big bags of spices and split them between us, and it is so much cheaper than your normal supermarket.

One of the obvious things to make with spices is a spicy vegetarian chilli. Super easy (don't be fooled by the list of ingredients - it is really difficult to get this wrong) and super delicious. Plus it follows my top tips for reducing food waste - apart from the spices, it is a rough recipe that you could use a selection of veg in, it makes the most of the spice cupboard, and I use some of my frozen food in it too. Tick, tick, tick!

Mix and match the vegetables - I used sweet potatoes and aubergine because I had them, but you could equally use butternut squash, courgette, peppers, carrots, fresh tomatoes. The pulses and lentils add lots of much needed protein!

The pitta chips instead of tortilla chips are much healthier. I always keep pitta bread in the freezer.

1 onion - chopped finely
2 cloves garlic - sliced finely or crushed
2 tsp paprika - mix and match different types. I use regular and smoked.
1-2 tsp chilli powder (depending on strength and how spicy you like it)
1 tsp cumin
1 tsp ginger
1/2 tsp cinnamon
2 sweet potatoes - chopped into bite size pieces
1 small aubergine - chopped into bite size pieces
1 tin of pulses - black beans, chickpeas work well
Handful of red lentils - thoroughly washed in warm water
1 tin chopped tomatoes
1 teaspoon sugar
Juice of half a lime (optional)
Olive oil

Frozen or fresh pitta bread

Preheat the oven to 200. Put the sweet potatoes and small aubergine in a roasting tin, drizzle with olive oil and season. Roast for around half an hour, or until the aubergine is slightly charring.

In the mean time heat a glug of olive in a heavy bottom saucepan or wok. Keep the heat quite low and add in the spices. Stir in the oil for 1-2 minutes, taking care not to burn them.

Add in the onion and cook until softened. Add in the garlic and cook for a further 1-2 minutes. 

Stir in the chopped tomatoes and sugar. Turn the heat up a bit to medium, and once the tomatoes are starting to simmer add in a handful of lentils. Thoroughly washing these before hand will stop the froth that you sometimes get when lentils are cooking. You can add some water in at this point to ensure that the lentils cook properly.

Once the lentils are starting to soften, stir in your other pulses and the roasted vegetables. Season with salt and pepper. 

Cook for about 5 more minutes until the lentils are soft with a little bit of bite. Squeeze in juice of half a lime if you have it.

Serve with pitta chips and some seasoned mashed avocado and/or creme fraiche/yoghurt.

Pitta chips -

To make the pitta chips, cut the pittas in half in the middle - so you end up with the thin top and bottom of the pitta bread. Does that make sense? I have no idea!

Cut the bits of pitta into triangles, probably around four per half of pitta depending on the size - but roughly tortilla chip size.

Place on a baking tray and drizzle with olive oil. Season with a reasonable amount of crushed sea salt. Pop in a medium heat oven for about 8 minutes, but do keep an eye on them. And then you have delicious pitta chips - great for this, but also with dips at parties!


Tuesday 25 March 2014

One pot vegetable pasta

After refocusing my mind on the point of this blog, I decided to give this one pot vegetable pasta a go.

This was inspired by this recipe on The Londoner blog, but with some of my top tips in mind. I liked the idea of this dinner as it is really easy to do and looked delicious, but I didn't have all the correct ingredients and had some other half vegetables that needed using.

I have used the basic principle of cooking all the ingredients for pasta and sauce together in one pot as inspiration, but experimented with my own take on it. And it actually worked! As Mr Store Cupboard Veggie said "this is actually quite nice" - high praise indeed.

This would work with a whole variety of vegetables. You can follow what I have done to the letter, or use similar vegetables that you have to hand. Things like sugar snap peas or frozen broad beans would be great, and you could obviously add more tomatoes and some fresh herbs like in The Londoner recipe.

Half an onion - sliced paper thin
Half a pepper, any colour - sliced thinly
1 carrot - cut in to batons
2 gloves garlic - sliced thinly
Some shredded white cabbage
Couple of handfuls frozen peas/broadbeans
12 cherry tomatoes, sliced in half
Couple of good glugs of olive oil
1 tsp dried oregano
Plenty of salt & pepper
500ml boiling water
Pasta of your choice, snapped in half if using long pastas
Parmesan to serve

You will need a big pan for this recipe. Snap the pasta in half if using longer types such as linguine or spaghetti, and lay it flat in the bottom of the pan.

Basically just plonk all the other ingredients in on top, apart from the frozen veg and parmesan.

Pour over the boiling water. Pop the lid on and heat on high until it boils. Turn the heat down so it is simmering, but leave the lid on. Cook like this for 5 minutes.

Uncover and turn the heat up to medium-high. The only thing you need to do at this point is to keep stirring it, making sure to turn the ingredients at the bottom over to the top otherwise they will stick. Put in the frozen veg at this point - adding them at this stage is sufficient to heat them through and will stop them being over cooked.

Most of the liquid will be absorbed or evaporated. Once this has happened the pasta should be cooked and coated in a sauce of an almost creamy consistency - something similar to risotto. Serve with plenty of parmesan.


Monday 24 March 2014

Top tips for reducing food waste

So this week I have been thinking about my top tips to help reduce wasted food.

This was inspired by both volunteering for FoodCycle (see earlier post), but also from the fact that I struggled a bit last week and found myself buying ingredients when I already had stuff ready to be used in the fridge.

I'm not going to pretend that cooking from the store cupboard is always easy - in reality some nights you are tired and feel uninspired by what you can see in front of you.

But then I was so annoyed at the weekend when I had to throw away food that could have been used during the week, or certainly rescued before making a trip to the bin. So I decided to come up with some tips to help me re-focus on what The Store Cupboard Veggie is all about - reducing the waste and making delicious  vegetarian food.

Over the next couple of weeks I will be trying to post recipes and ideas with the following in mind. Some will even tick more than one box...how's that for multi-tasking?! Try to remember these when deciding what to eat, and hopefully we can all reduce the waste at least a bit.

1. Experiment - don't be afraid to try using the ingredients you have to hand
2. Don't stick to recipes - use recipes as inspiration, not a step-by-step guide
3. Use it all up recipes - have these on hand for when you have a lot of ingredients that need using, and possibly not a lot of time to use them
4. Use the freezer - to both store left-over food, but also to keep some of those ingredients fresh!
5. Spices - stock up, and actually use them! Having the right selections of spices to hand can transform a lot of tired ingredients
6. Prioritise - what needs to be used? Try to use fresh ingredients before turning to tinned or frozen food
7. Plan plan plan. Think about what ingredients you have, and how to get the most out of them.

Saturday 15 March 2014

FoodCycle Volunteering

Today I spent the morning and some of the afternoon volunteering with FoodCycle Wandsworth - a great charity that is working to combine surplus food with hungry communities! As you know if you have read any of my other posts, I am on a mission to reduce the amount of food I waste at home - and FoodCycle does this too, but on a much larger scale.

They work with local shops to take any produce that is perfectly fine to eat but that people wont buy. Fresh bread from the bakery that didn't sell yesterday, slightly bashed fruit and veg, or boxes of eggs when one or two have been broken. I was astounded by the amount of food that was donated by the local shops. More than two shopping trolleys full of bread and two large bags full of boxes of eggs from one supermarket, for example. Where that would have gone if it hadn't been claimed by FoodCycle is anybodies guess, but I would imagine the bin.

The aim is to make three courses from the donated food, and then serve these to anyone from the local community with a sit down meal. It guarantees a filling and healthy meal once a week for those that may not get it otherwise, plus brings different people in the community together.

The starter was bruschetta, and given the huge amount of eggs we had we decided the best idea was frittata for the main course - already one of my favourites for using up eggs and sad vegetables, see my Home-made Mondays Cauliflower Fritatta.

I was put on frittata duty, and I have never fully appreciated before how long it takes to peel potatoes for 50 portions. Despite the lack of a frying pan, plus an oven that was as much use as trying to cook with a hairdryer, the frittata turned out pretty well I think...I hope....no-one complained so that's a good sign, right?!

This was all topped off with an apple compote with cinnamon eggy bread, and some brilliant community spirit!

So check out FoodCycle, or see if there is anything similar in your area. It was tiring but satisfying, and I would highly recommend it.

Friday 14 March 2014

Home-made Mondays - Easy Cauliflower Frittata

My recipe for home-made Mondays this week was inspired by a rather under appreciated vegetable - the  cauliflower.

I tend to use it in curries, and it always works a treat. But I never use a whole head of cauliflower so end up left with some in the fridge. Not enough for cauliflower cheese, but I don't want it to go to waste as that would defeat the whole point of what I'm aiming to do! Must.reduce.the.waste.

I have seen quite a few vegan and gluten free recipes that use cauliflower as a substitute for anything from pizza bases to rice. I am yet to try this, but I will obviously keep you updated on my success/failure when I do!

In the mean time here is my recipe for cauliflower frittata. It ticks quite a lot of boxes; healthy, protein rich, left-over friendly, easy and delicious.

200g cauliflower florets - bite size
200g potatoes - 1cm cubed. Peeled if using older potatoes.
5 Spring onions - sliced thinly
5 eggs
100ml milk
Handful frozen peas
Olive oil
20-50g grated/crumbled cheese - cheddar, parmesan, feta

Preheat your grill to a medium heat.

Par boil the potatoes. Steam the cauliflower at the same time.

Break the eggs into a large bowl and beat gently with a fork. Add in the milk, spring onions, frozen peas, cooked cauliflower and potatoes. Season well, and give it a mix.

Heat a glug of olive oil in a non-stick frying pan (preferably one with an oven proof handle!). Pour in the egg mixture. Cook on a very low heat - be patient with this as otherwise you will burn the bottom and have uncooked egg on top. Not tasty!

After around 15 minutes on a low heat the bottom of the fritatta should be cooked. It will have firmed up around the very edges and be bubbling slightly in the middle.

Sprinkle the cheese over the top. Pop under the grill for 5-10 minutes until golden brown. Keep a close eye on it.

Serve hot, warm or cold with a side salad and some bread if you like.


Thursday 13 March 2014

Spring Veggies Risotto

Sometimes you want a dinner that's easy to make, but still feels a wee bit special. Risotto gets a bad reputation for being a hard work meal - but really it's just stirring. A packet of risotto rice is an essential ingredient in my store cupboard.

If you have fresh green vegetables in the fridge then you can use these for this recipe - anything like leeks, asparagus, sugar snaps will work. But equally frozen vegetables are good in a risotto too!

Using home-made stock from the freezer will make this a Home Made Monday recipe, but if you don't have this then try to keep a good quality stock on hand.

This is the recipe I follow, depending on what I have in the house. If you don't have leeks then start with a white onion instead. It serves 3 hungry (greedy) people, or 4 normal people.

350g risotto rice
50g Butter
Olive oil
1l vegetable stock
5 spears asparagus - cut in to 1cm chunks, apart from the heads
1 leek - cut in half length ways and sliced thinly
Handful each frozen peas and broadbeans
Vegetarian parmesan
Rind of half a lemon

Melt butter in a large pan and add a glug of olive oil. Saute the leeks on a low heat until softened - be careful not to overcook the leeks, if they go brown they get quite bitter.

Add the risotto rice and stir well. Cook until the grains of rice start to go translucent around the edges. Start adding the stock, a ladle full at a time. Stir until the stock is absorbed, then keep adding a ladle at a time.

Once you are about three quarters through the stock add in the asparagus.

Keep adding stock until it is all gone. Add in the frozen vegetables, parmesan and lemon rind with the last of the stock.

Check the rice is cooked through, it should still have a bite to it. If it is too hard then add boiling water, a ladle full at a time, until it is ready.

Serve immediately.

I actually garnished mine with baked leek fries - reserve a strip of leek at the beginning, drizzle with olive oil and bake for 15 minutes until crispy.


Tuesday 11 March 2014

Lentil and Butternut Squash Soup

You may have guessed from my blog posts so far that there are a few ingredients that I always seem to have in my cupboards. This is for two reasons; they are delicious, and I have found the best way to keep food costs down is to be predictable with the ingredients you have available. My monthly shop doesn't vary that much in terms of what goes in my trolley and how much it costs, but what I make with these ingredients does.

This recipe is inspired by one of the recipes from my cooking lesson at Greenz, the vegan/vegetarian restaurant in Tulse Hill, but with my own stamp on it based on the food I tend to buy. These are the ingredients I am focusing on today...


And this is why they always find their way into my shopping trolley:

Lentils - cheap, healthy and delicious. Great source of protein.
Butternut squash - versatile, healthy and tasty. Not massively cheap, but you can get a few meals from one squash. Bulks out this soup nicely.
Ginger - this is again not something that one would consider a particularly cheap ingredient, and I'm sure goes to waste in many fridges. But just a little adds great flavour to so many dishes, and a great tip is that you can freeze it and grate it while still frozen as and when you need it.

If you like one or all of these ingredients then you should try this soup - it is Souper Douper healthy, easy to make and delicious. Adding the ginger at the last minute was one of the lessons I took away from Greenz - it gives the soup a really fresh zingy flavour. Pretty much all you need to make this is a large pan and a hand blender (see butternut squash "pesto" recipe for my thoughts or hand blenders).

Half butternut squash - seeds removed. Peel if you like, but the skin wont hurt and it will be whizzed up anyway. Chop into roughly 2 cm cubed pieces.
200g red lentils - thoroughly washed
Thumb sized piece of ginger - grated
2 tsps ground cumin
1 litre boiling water/veg stock
3 tomatoes, chopped into chunks
Glug of olive oil

Heat a large saucepan. Add a glug of oil to the pan. Chuck in the butternut squash and the ground cumin - give it a good stir and fry gently for a couple of minutes.

Make sure you have washed the lentils thoroughly in a sieve under cool running water, until the water runs clear. This will stop the scum that  can appear when cooking lentils. Add the lentils and the boiling water or vegetable stock to the squash.

Cook until the lentils and squash are soft, probably around 15-20 minutes. Season with salt and pepper and then take off the heat.

Stir in the ginger and tomatoes. Using a hand blender whizz it up in the pan until it's smooth. Give it a stir to check it is as smooth as you would like it. Reheat gently until hot through. Serve with a swirl of creme fraiche/yoghurt if you have it, and some crusty bread.


Use It All Up Easy Vegetable Stir fry

This week I was looking at an interesting piece examining the amount of food wasted by the average UK household in real terms. Just in the UK the food wasted by households each year is equal to 7 million tonnes - or roughly the same weight as the largest of the pyramids! Of this 7 million tonnes, 4.2 million tonnes represents food that could have been eaten, but ended up past its best and in a landfill.

This drives home to me the reason why I started this blog. Although one of the reasons is that I am trying to cut back on my spending and make cheap and delicious food, I also hate the amount of food that gets put in the bin. As a people we are too greedy and too lazy, and a small change to the way we shop and eat makes a difference to how much you spend on food as well as how much gets chucked away. I'm not saying that I don't still find ingredients festering in the fridge and regret not using them sooner, but I am making a conscious effort to change what I buy and eat to get the most from my shopping.

I always stock up on plenty of vegetables, and one of the best ways I know of using up any of those slightly sad or unusual ingredients is in a stir fry. Obviously this can be made as soon as you get your veggies home from the supermarket too! This sort of dinner is so flexible, and has transformed many a slightly limp vegetable before it can venture into the light and embrace the afterlife in the bin.

Obviously it is easy to buy a stir in sauce, but these can add unnecessary sugar and salt to your meals without you realising it. These are the ingredients I keep on hand for a basic but delicious stir fry sauce. This will work with pretty much any vegetable... I was going to include some vegetables here that wouldn't be suitable, but I'm having trouble thinking of any. A potato? Maybe. But I still think it would be worth trying.

1 chilli - red or green, as hot as you like. Sliced finely
1 glove garlic - sliced finely
Thumb size piece of ginger - grated
Glug of sunflower or olive oil
1 tablespoon sesame oil
2 tablespoons soy sauce - I use light
Juice of half a lime
Vegetables of your choice
Rice or noodles to serve

Heat your wok - make sure it is nice and hot. Add your cooking oil (NOT the sesame oil yet!). Once the cooking oil is really hot chuck in the grated ginger, chilli and garlic. If you wanted to use tofu then add this at the same time. Stir fry on a high heat for a minute or so - it does need to be hot, but be careful not to burn these flavours. The key to it is that it's a STIR fry, so keep STIRring!

Add in the vegetables. If you have anything that might need a bit longer cooking - broccoli stalks for example (yes I said STALKS, they are delicious. Please don't throw them away) - then add them in first. Stir fry for a couple of minutes, and then add in the rest of your veggies. You may want to hold off adding any delicate vegetables until the very end, peas for example don't need much cooking. Add in soy sauce and sesame, stir fry for a minute or so.

Splash in the lime juice as well as any remaining vegetables - peas, bean sprouts, spring onions - for the last minute of cooking. Serve with noodles or rice, garnished with coriander or sesame seeds if you have them.


Thursday 27 February 2014

Left-over Butternut Squash "Pesto"

One of my favourite things in the kitchen is to use leftovers to make a completely different type of meal. In my last post I mentioned reserving a couple of spoonfuls of roasted butternut squash from the spicy quinoa stuffed squash. This could apply any time you roast any type of squash, or even something like roasted peppers - hold back a bit and use it the next day for this perfect pasta dish. I have called it "Pesto" as this is what inspired this sauce, but I put it in "" to protect myself from the wrath of any pesto purists!

I moved out of my parents house just over a year ago, and as yet haven't built up much cooking equipment of my own beyond the basic pots, pans, wooden spoons and roasting tins. One thing I did invest in, however, is a hand blender.

I use the word invest quite loosely - the hand blender I own is a Tesco's own brand one. I tried to find it to post a link, but it isn't on their website. The point is, however, that you don't need to spend lots of money to get a hand blender that has the right attachments for you and does a perfectly good job. I used the small processor part for this recipe.

This would also be a great way to use up a little bit of basil - sometimes you don't have enough to make pesto, but then you risk it going limp and wasting it. I didn't have any for this, but do add it in at the whizzing up stage if you have some.

30g hazelnuts (I had these - use pine nuts if you have them)
20-30g vegetarian parmesan/grana padano
2 gloves garlic
Left-over butternut squash
Olive oil
Mange tout/sugar snaps/peas/broadbeans
Pasta for the number of people eating

Get the water on for the pasta, salted of course.

Combine the hazelnuts, cheese, garlic, squash and a couple of glugs of olive oil in the mixer. Whizz up until smooth, and something like this...


Season to taste.

Cook the pasta according to packet instructions. A couple of minutes before it is ready add in some green vegetables - I had some sad looking mangetout in the fridge so I used those.

Before draining the pasta reserve a little bit of the pasta water. This is a good tip for any pasta dish - it helps the sauce and pasta combine.

Drain the pasta. Return to the pan and add a knob of butter. Stir in the butternut squash mixture, heating gently. Add in some of the reserved pasta water to loosen it slightly.

Serve, garnished with some parmesan shavings.


Tuesday 25 February 2014

Home-made Mondays - Spicy Quinoa Stuffed Squash

I sometimes have a tendency to be a bit lazy and rely too heavily on processed foods rather than making from scratch.

I'm not so much talking about ready meals, but more meat substitute type foods such as Quorn. Although Quorn and the like are great sources of protein and tend to be low in fat they are, ultimately, still quite heavily processed foods. I certainly don't use processed foods in every meal, but I thought it would be quite nice to have one night a week where I consciously create meals from scratch. Meat-free Mondays are a given anyway, so my vegetarian alternative is Home-made Mondays (not a very catchy title I'm afraid)!

I urge you all to try this. Embrace it! Add it to your Meat-free Monday! It is really good to be aware of what you are putting in your food, or what someone else is putting in your food for you. You will be surprised how many processed ingredients you use without even realising. Or maybe it's just me - give it a try and see if you learn anything about the way you cook and eat.

As always I will be aiming to make a meal that also uses up some of those good-for-you but neglected ingredients, and keep it as cheap as possible. As it's a Monday night it also needs to be fairly straightforward to make. Not too many boxes to tick then...

I have based this weeks Monday meal around two of my favourite ingredients - butternut squash and quinoa. Quinoa is really healthy - unlike couscous (which is processed durum wheat) it is a natural grain, which is low in fat but is a complete-protein and high in fibre and iron . It is also gluten-free!

So here it is...spicy quinoa stuffed squash, topped with an egg and a side of tomatoes. So comforting and really, truly delicious. You will have to take my word for it, as the picture quality is pretty dodgy for this post. These are genuinely things that I cook and eat, and tonight I was super hungry (greedy) and kind of forgot to take a picture before sitting down to eat!

Butternut squash
Olive Oil
80g quinoa
Chillies (as many/few as you like) - sliced
Red onion - cut into half moons
1 clove garlic - sliced
1 tsp of Paprika, cumin or chilli powder
3 tomatoes - halved
Pinch of fresh or dried herbs
Olive Oil
Eggs (same as number of people).

Pre-heat the oven to 180°. Cut the squash in half, remove the seeds, and put into a roasting tin. Drizzle with olive oil, season with salt and pepper. Put it into the over and roast until soft – about 40 minutes to an hour depending on the size of the squash. Mine was HUGE so took closer to an hour.


While the squash is cooking prepare the quinoa according to packet instructions. I tend to use water rather than vegetable stock as advised on most packets - I'm not a massive fan of the stock taste, plus it is Manufactured Free Monday so would have to make my own stock from scratch! I also use a little less water than recommended as soggy quinoa is to no-one’s liking. Cooking the quinoa takes about 15 minutes. Once cooked, drain and leave to one side.

Heat a tablespoon of olive oil in a pan and add the onions. Fry gently until they start to soften, and add in the chillies and garlic. Add in the spice powder – I gave a few options here because they would all be tasty, I used smoked paprika because that’s what I had – and heat quite gently for a minute or so.

Remove the onion mixture from the pan using a slotted spoon, and add to the quinoa.

Once the squash is soft remove it from the oven. Take a large spoon and scrape the flesh from the skins, leaving enough flesh to hold the skins together. Leave aside around two table spoons of the squash – this will be used in another meal tomorrow. Mix the rest of the squash with the quinoa mixture, season to taste, and spoon into the squash skins.

Return to the oven for 25 minutes.

Place the halved tomatoes cut side up in a roasting tin, and sprinkle with some dried or fresh herbs and salt and pepper (I used fresh thyme). Drizzle with olive oil, and place in the oven until soft – about 20-25 minutes.

Finally, use the spiced oil that remains in the frying pan to cook the fried eggs. Covering with a lid means you won’t need to add any additional oil as there will be heat on all sides of the egg.

Remove the squash and tomatoes from the oven. Serve, top each half of squash with a fried egg.


Sunday 23 February 2014

Left-over Cheesy Pasta Bake

I met up with my old housemates from university this week for a cheese and wine night - how very civilized of us! The host very sweetly made sure that all the wines and cheeses were vegetarian too. Look at this delicious lot...

I think this might be a sign that we are well and truly adults now. We have also started a Brunch Club. Once a month one of us will choose somewhere delicious to have brunch - I now need to find somewhere in South West London that has interesting vegetarian brunch options to wow my friends with. It's not a competition, and yet it would be horrible if you chose somewhere that no-one liked! I do LOVE the fact that the majority of our meet-ups are now focused around food rather than Jaegerbombs. Goodbye evil hangovers, hello satisfied food belly.

No matter how hard we tried, we simply could not eat all the cheese. My host said he was going to throw the left-over cheese in the bin as he wouldn't eat it. This is an OUTRAGEOUS waste and basically money down the drain, so the cheap-skate opportunist in me begged for a plastic seal-able bag to take some of the left-overs home.

There are all sorts of things you can do with some ends of cheese. Even the rinds can be used to add flavour to things - dropping a cheese rind into a tomato-ey vegetable soup sounds weird, but actually works to add a lovely cheesy depth of flavour. I decided to make an unctuous cheesy pasta bake. This is not an exact recipe, as I was simply using what I had, so adjust for how many people you have as well as what you have left-over. If you need an exact white sauce recipe then there are plenty to chose from on the BBC food website - I tend to wing it a little bit. **Warning, this is NOT a healthy recipe!**

I always buy tortelloni when doing my monthly shop, as it is always on offer, keeps well in the freezer and makes for a slightly more interesting pasta bake. This is one of my favourites...


Start by making a basic white sauce. Melt butter in a non-stick pan, then add the same weight of flour-to-butter and cook for a couple of minutes until the flour is cooked out. Start adding in milk, stirring continuously. I use a whisk for this as I find it helps stop lumps in the sauce. Bring to the boil - keep stirring! Then heat gently until the sauce thickens. Season with salt and pepper (white is best, but black pepper is fine too).

In the mean time boil water for the pasta. Add salt to the water.

Grate your cheese - I used about 100g. The selection I had was Cheddar, Lancashire, and smoked Cheddar. I wish it had been my brilliant lightbulb-type-idea to add smoked Cheddar, rather than just what I had, as it worked really well and I would like to be able to take credit for it.

Pop the tortelloni in the boiled salted water - it only takes three minutes to cook.

Take the white sauce off the heat and add in most of the cheese. Leave some aside to sprinkle on top.

Once the pasta is drained combine with the sauce and mix well. Put in an oven-proof dish and sprinkle with the rest of the cheese. Pop in a pre-heated oven (about 180) until brown and bubbly on top. I served with peas as a nod to healthiness, and they break through the rich cheesiness too. Also good would be sliced tomatoes, or a green salad.

A brilliant use of unwanted cheese and tortelloni from the freezer!